This is a self-contained installation manual to setting up a web server on your Windows machine along with installing some commonly used resources and tools that go along with the web development process.
- Apache will be installed to act as the web server.
- PHP will be installed as the server-side scripting language.
- MySQL will be installed to provide database functionality.
- phpMyAdmin will be installed to administer the databases.
I completed this setup on my Windows 7 (64-bit) machine.
Apache
Choose the Apache version you want and download the Windows binary from here.
For this setup, I used Apache 2.2.25 with support for SSL.
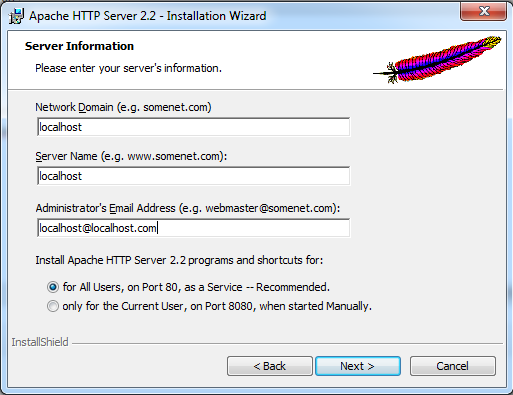
Run the Apache installer after it has been downloaded.
On the Server Information screen, use localhost as the values in the fields.
On the Setup Type screen select Custom and set the installation path to C:\Server\Apache. We will centralize all of the server’s components in one common directory for a clean setup.
After the setup of Apache has been completed, you should be able to navigate to http://localhost and see It Works!. If you see this message, Apache has been installed successfully and we can move onto the next step.
Changing the Document Root Folder
By default, the document root folder will be C:\Server\Apache\htdocs. We want to change it to something less dependant on Apache, so we will change it to C:\Server\www.
To do this, open up httpd.conf found at C:\Server\Apache\conf\httpd.conf and make the following changes:
Line 180:
DocumentRoot "C:/Server/Apache/www"
Line 207:
<Directory "C:/Server/www">
Restart Apache. Move index.html from C:\Server\Apache\htdocs to C:\Server\www. Now check http://localhost. You should still see the “It works!” message and we’ve successfully changed the document root folder.
Enabling .htaccess Rewrite Rules
To get your .htaccess rewrite rules working correctly, modify C:\Server\Apache\httpd.conf.
Uncomment the loading of the rewrite module on line 119
LoadModule rewrite_module modules/mod_rewrite.so
Change line 227 to
AllowOverride All
PHP
Choose the PHP version you want and download the Windows binary from here.
For this setup, I used PHP 5.3.28 (Thread Safe).
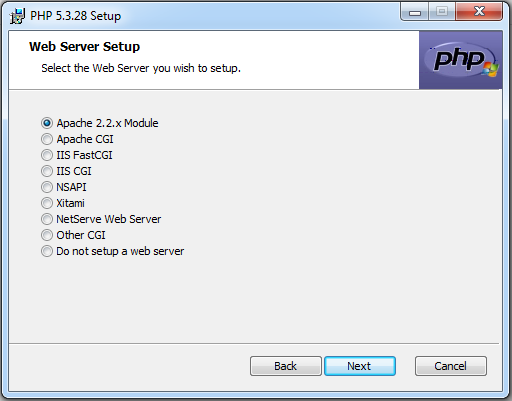
Run the PHP installer after it has been downloaded.
Just like with Apache, we will install PHP into the C:\Server directory. Set the destination folder to C:\Server\PHP.
On the Web Server setup screen, choose Apache 2.2.x Module.
On the Apache Configuration Directory screen, browse to C:\Server\Apache\conf.
Run through the rest of the screens and finish the installation of PHP.
To test if PHP is working and correctly configured to work with our Apache server, we will create a PHP file and navigate to it.
Create the following file at C:\Server\Apache\htdocs\phpinfo.php.
<?php phpinfo(); ?>
Restart Apache using the tray icon and then navigate to http://localhost/phpinfo.php. If you can see information displayed about your PHP configuration, PHP has been successfully installed.
Recognizing “index.php” As A Directory Index
By default, only index.html files are recognized as directory index files. Let’s add index.php to that list.
Open up httpd.conf found at C:\Server\Apache\conf\httpd.conf and change:
Line 242:
DirectoryIndex index.html index.php
Enabling Displaying Errors
We need to enable error displaying if we want compilation errors to be displayed through the browser when they occur in our code.
Open up php.ini found at C:\Server\PHP\php.ini and edit the following lines:
Line 538:
display_errors = On
Line 549:
display_startup_errors = On
Setting the Default Timezone
If you encounter the annoying message Warning: main(): It is not safe to rely on the system's timezone settings. You are *required* to use the date.timezone setting or the date_default_timezone_set() function., you should set the default timezone in php.ini.
Line 975:
date.timezone = US/Eastern
In my case, I set it to use Eastern Standard Time.
MySQL
Choose the MySQL version you want and download the Windows binary from here.
For this setup, I used MySQL 5.6.15.
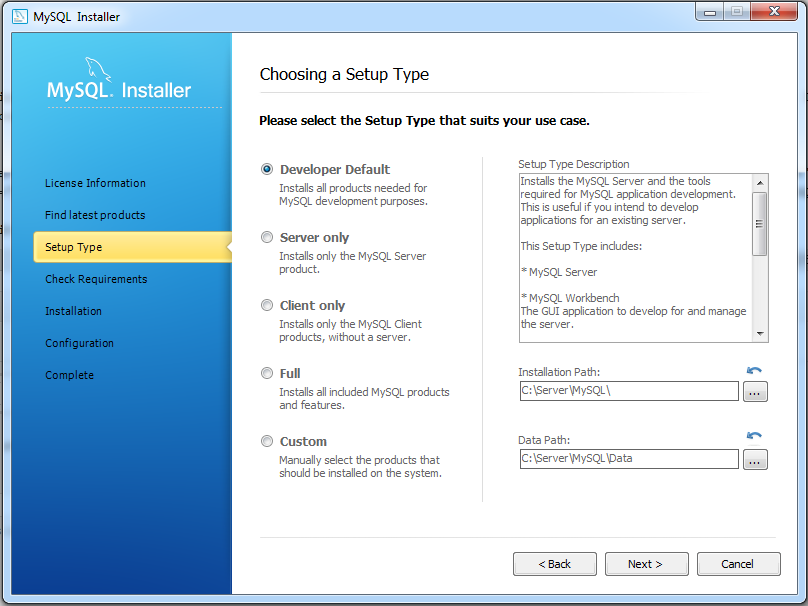
Run the MySQL installer after it has been downloaded.
Choose Developer Default for the Setup Type and change the Installation Path to C:\Server\MySQL and the Data Path to C:\Server\MySQL\Data.
Continue through the screens using the default values. When prompted, specify a password for the root user. You may also add any additional MySQL users, but of course users can be added later directly through MySQL or by using phpMyAdmin.
We can quickly test to see if MySQL has been installed successfully. Create a new file called connect.php in the document root folder (C:\Server\www) with the following contents:
<?php
	$link = mysql_connect('localhost', 'root', '[PASSWORD_HERE]');
	if (!$link) {
	    die('Could not connect: ' . mysql_error());
	}
	echo 'Connected successfully';
	mysql_close($link);
?>
where [PASSWORD_HERE] is the password you specified for the root user during installation.
Now navigate to http://localhost/connect.php. If you see Connected successfully, everything is working good! Otherwise, refer to the error specified and troubleshoot.
phpMyAdmin
Download phpMyAdmin from here.
For this setup, I used phpMyAdmin 4.1.3.
Extract the downloaded archive to C:\Server\www\phpMyAdmin.
Create an empty folder called config at C:\Server\www\phpMyAdmin\config.
Now navigate to http://localhost/phpmyadmin/setup to begin the setup.
If you see errors at the bottom of the index page in phpMyAdmin, do the following steps:
- Delete the config folder that you just created.
- Create a copy of config.sample.inc.php and rename it to config.inc.php
Installation Complete
If you’ve followed all the instructions, you should now have a working Apache web server with PHP, MySQL and phpMyAdmin setup and working.